Having trouble with your clipper? Take a look here, maybe we can solve it together!
Most common clipper problems and how to solve them Having trouble with your hair clipper? We have put together an overview of the most common issues you may encounter when using a hair clipper, their possible causes and simple solutions. Many problem…
Most common clipper problems and how to solve them
Having trouble with your hair clipper? We have put together an overview of the most common issues you may encounter when using a hair clipper, their possible causes and simple solutions.
Many problems can be fixed by properly cleaning, oiling or adjusting the cutting head. If you do not feel confident about the repair or the problem persists, you can also use our authorized clipper service.
1. The clipper cuts poorly or pulls hair
Possible cause: The cutting head is dirty, insufficiently lubricated, poorly adjusted or worn out.
Solution: First, thoroughly clean the cutting head and remove all remaining hair or fur. Then apply a few drops of oil intended for cutting heads and turn the clipper on for a few seconds so the oil spreads evenly between the moving parts.
If the clipper still does not cut properly even after cleaning and oiling, the cutting head may be dull or worn. In that case, you can replace it with a new one or send it to us for professional sharpening and service.

2. The clipper battery lasts too short a time
Possible cause: A shorter runtime does not automatically mean a faulty battery. Very often the cause is a dirty or insufficiently lubricated cutting head, which puts greater resistance on the motor. The clipper then uses more energy while working and lasts a shorter time on a single charge.
Solution: First, thoroughly clean and oil the cutting head. Then fully charge the clipper and test its runtime again.
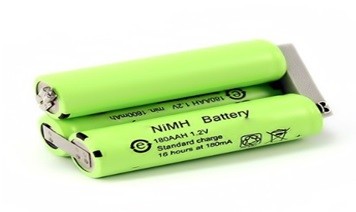
If the runtime is significantly shorter even with a properly cleaned and lubricated head, the cause may be a worn battery. Battery capacity gradually decreases with use and age, and after a certain time replacement may be necessary.
Solution for a worn battery: Replace the battery with a new one.
We recommend entrusting the replacement to our authorized service. We use appropriate spare parts and after the repair we check and test the clipper.
3. The clipper injures or scratches the skin while cutting
Possible cause no. 1: You are pressing too hard on the skin while cutting.
Solution: Reduce the pressure on the clipper, especially when cutting very close to the skin. A properly adjusted and sharp clipper should cut without the need for significant pressure.
Possible cause no. 2: The cutting head is damaged or incorrectly adjusted.
Solution: Carefully check the teeth of the cutting head. If any tooth is bent, cracked or broken, do not use the head any further and replace it with a new one. Damaged teeth can cause skin injury.
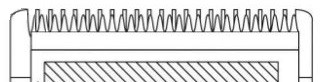
With some types of screw-mounted cutting heads, they can also become misaligned or shifted, for example after a fall or handling. The moving blade must not extend past the fixed part of the head toward the skin, otherwise the clipper may scratch or cut during use.
If the design of the head allows adjustment, slightly loosen the fastening screws and set the individual parts of the head to the correct position. Before using it again, always check that the moving teeth do not extend past the fixed teeth anywhere.

A properly adjusted cutting head should look approximately like this when viewed from above:
If you are not sure about the adjustment, it is better not to use the head. You can send it to us for inspection and adjustment at our authorized service.
4. The clipper does not charge or the charging indicator does not light up
Possible cause no. 1: The clipper is not properly placed in the charging stand.
Solution: Check that the clipper is properly seated in the charging stand and that the charging contacts are clean. You can remove the clipper from the stand and insert it correctly again.
Possible cause no. 2: A problem with the adapter or power supply.
Solution: Check that the power adapter is properly connected to both the stand and the electrical outlet. Also inspect the power cable and connector for visible damage.
If your model allows connecting the adapter directly to the clipper, you can use this method to verify whether the problem is related only to the charging stand.
Do not use an adapter or charging stand from another clipper just because it fits the connector. Individual models may use different electrical parameters, and an unsuitable adapter can damage the clipper.
If the clipper still does not charge or the charging indicator does not respond, contact our authorized service.
Regular maintenance prevents most problems
Many faults can be prevented by simple regular maintenance. After every cut, we recommend removing hair and dirt from the cutting head and regularly oiling the head. The clipper will work with less resistance, the head will heat up less, and at the same time you will limit its premature wear.
If the problem persists or you are not sure of its cause, there is no need to replace the clipper with a new one right away. In many cases, it is enough to replace a worn part, sharpen or adjust the cutting head, or carry out a routine service repair.
More information about repairs, sharpening and our authorized service can be found here.